
I often get emails asking me about my favorite tools or supplies and I actually love those emails because they make me think of why I tend to use some things all the time.
Is it laziness? What is it about these items that make me grab for them whenever I create a Mixed Media Project?
One of the answers that came up for almost all of them is “I use them because of their versatility of usage” . That is an easy guess for an answer- LOL- since I named my favorite Online Workshop series Über*Media playing on the fact that you can use some items so MANY different ways.
But let me take you the next couple weeks on a little journey on my favorite Mixed Media essentials and explain why I could bathe in them and show you where I used them. I will add as I posted on the main blog to this page ! I also post my favorite supplies in each group 🙂 You can see all the posts at once here on the page – or you click on the single posts – here is a list 🙂
1. Acrylic Paints
2. Gesso
3. Markers & Pens
4. Stamps
5. Stencils & Masks
————————————————————
1. Acrylic Paints
Hands down my all time Mixed Media Essential is Acrylic Paint.

I had a very intense acrylic paint phase a couple of years ago and then I guess I needed a break and neglected those beauties for spray paints for a while. But I am so glad I came back to them!
What I love about Acrylic Paints is:
- they are fast drying
- generally cheap – or at least long-lasting even if it is a bit more pricey
- they have a plastic like surface (due to the plastic polymer emulsion)
- they can be thinned with water and that could make them almost look like water-color in some cases
- they are permanent once dried
- they cover surfaces if opaque
- you can use other paint media on top of acrylic paints
- you can use some fun media with them for amazing backgrounds and textures
- you can create amazing backgrounds and texture with solely acrylic paints
Here are some examples:
beautiful easy background – that can be also used for a scrapbooking layout:

background and texture with acrylic paints:

background and texture using other media and cheap supplies:

texture creating on a scrapbooking layout:

creating some fun handmade embellishments and use it for some accents on a layout:

using them with other acrylic media

using it on difficult surface – like acrylic pages of a minialbum

using acrylic paint to make embellishments your own

Pretty amazing what you can do with acrylic paints, isn’t it? And there is way more!!! So yes – just because of it’s versatility it knocks me off my socks and is my all time favorite essential ![]()
Which acrylic paints I use:
Here comes a saying that I learned when studying law : “It depends” – LOL. Nice one, huh?
Well, I used a lot of acrylic paints. And over the last couple years I learned what I like and what I do not like.What I like, doesn’t have to be necessary what you like. so just take it as my thoughts and my preferences, ok?
- So first of all let’s state that I like good quality artist paints. Because I learned over the years that especially when working in an art journal for example that they aren’t that tacky as a lot of the cheaper non artist ones.
- I also love good quality artist paints because the color shift between wet and dry is not that high. I love to see how my work might look like when it is dry while I’m still working with my paints. I had many disappointments in the past where I was thinking a nice bright red was rocking my socks and then it was dry and a dark bloody mess as the paint shifted a lot when it dried.
- Highly pigmented colors go a longer way and they are usually also more beautiful. They also can be buffed for a great glossy finish- which for me also is mostly true for more expensive artist paints.
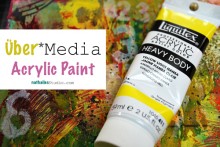
- I love texture and I love to create texture with paints – so I prefer thicker colors – I can also just thin them down if I want – and so I am a big Lover of Liquitex Heavy Body Acrylic Paints. I also like Winsor & Newton especially when it comes to their translucent acrylic paints. A good bargain and a very good quality are alos the Liquitex Basic Acrylic Paints.

 |
 |
 |
———————————————————————————————-
2. Gesso
Yesterday I talked about Acrylic Paint as my favorite Essential but that is followed very close by Gesso – I looooveee Gesso!

Gesso is like a magic bullet. Seriously. Gesso should be in your craft room….there is no doubt about it! If my Mixed Media Essentials were characters of Harry Potter…Gesso would be Dumbledore …and come one…who doesn’t want Dumbledore in their studio helping with some spells of Love ![]()
What I love about Gesso is:
- It can be applied to many surfaces like canvas, fabric, wood etc. and creates a surface that can be painted on.
- It gives tooth. So you can paint also surfaces where usually paint would not grab on- for example Metal.
- There is thicker Gesso and thinner Gesso. You can find white, black and clear Gesso – there are even other colored Gessos but I would say these are the most used ones. You can always change the color with Acrylic Paint yourself.
- It is an amazing medium to add texture with tools and household items, embedding supplies or by using it with stencils etc.
- It is the cure whenever something went totally wrong…just paint over with gesso ….it is the magic bullet

- White Gesso is the cheapest white paint
- It is amazing to tone down or change colors of your backgrounds or scrapbooking papers
- there is a huge amount of techniques including resist techniques with gesso that you can do -ahhh- happy mixed media land

Here are some examples:
White gesso for textured background and on flowers used

treated background with stencils, embedded elements and then spray painted

creating texture with Gesso before using paint media

primed a frame with clear gesso and then used here and there translucent and opaque paint media

Black gesso for texture, torn open to reveal background again

Gesso to create handmade textured embellishments

Clear and white gesso used to create this moody textured background

Embedded chipboard elements in gesso

Just pulling those projects together makes me wanna go into my room and play with Gesso again!
Which Gesso I use:
As always in this series- the answer to this question is based on my preferences, my style and my experiences
- I do use white, clear and black gesso.
- Lately I use Liquitex Gessos a lot- I love the consistency, coverage as they are highly pigmented and their consistence. I have only seen the clear gesso by Liquitex btw. For the black Gesso I used mostly Golden.
- I tend to like the thicker gesso more- I don’t like the liquid stuff- makes sense, because I love texture and you can water gesso down…so why waste money on the thin stuff?
- I used to buy big buckets of Gesso – which makes sense if you use them up in a workshop right away with lot’s of students, but now I buy smaller jars, even with my crazy usage of gesso, I had it dry out after a while and then it was a waste of money.
- When you start out and you just want to get a feel for Gesso – the Liquitex Basics Gesso is a good start 🙂
 |
 |
 |
 |
———————————————————————————————–
3. Markers & Pens
I wouldn’t necessarily say that Pens and Markers come at third place- but I would say that this is what I get the most questions about “What kind of marker/pen do you use on your projects with x? And so I will talk about my favorite ones now ![]()
If you missed the other posts in this series – you can catch up here

I would say these are my top seven- always go to pens and markers.
What I always keep in mind when I use pens and markers is:
- There is a right pen or marker for every surface
- Make sure your paint media- all media on your surface is completely drybefore you start writing on it…otherwise you ruin your pen.
- Avoid the “fat” areas – meaning those areas – that you treated with oily and waxy paint media when you use felt markers or acrylic markers in general.
- Be careful when you use an oil based marker or pen over water-soluble surfaces. Oftentimes the medium underneath reacts and the oil based marker bleeds into it. If that is what you want…you are good to go
Which pens and markers I use:

This pen is awesome – that is why I have it…well…kidding aside – LOL. This permanent marker can be used on all kinds of surfaces including glass and acrylicand CD’s. I write with it on paper, as long as it is smooth paper, otherwise it tends to bleed. I use it because I love how it writes. When I write something on atransparency– I use it- it is the best on transparencies. I use it on smooth acrylic surfaces – it works like a charm. Not so good to use on textured surfaces- you ruin your pen…and believe me…hehehehe- I tried ![]() It comes with different tip sizes and it has an eraser in the back for the slick surfaces.
It comes with different tip sizes and it has an eraser in the back for the slick surfaces.

This is an ink pencil and when you write with it or make marks, they are pretty prominent as the pencil itself is highly pigmented and firm. You can also use water on it and then wash the pigments out. Once it is dried…it is permanent! YES…you heard right. As I lack the impressive Julie-Fei-Fan-Balzer-handpainted-brush-title-ing – I use this pencil to highly fake this ![]() I write with the pencil in a what I think artsyfartsy way my title and then use water and a small brush and just go over it so it looks more like a brush painted title. Of course…as the description has given it away already, you should not use wet media on top of it without intention…you will activate and smear your writing otherwise.
I write with the pencil in a what I think artsyfartsy way my title and then use water and a small brush and just go over it so it looks more like a brush painted title. Of course…as the description has given it away already, you should not use wet media on top of it without intention…you will activate and smear your writing otherwise.

A classic white gel pen. I love how fluidly the ink comes out. It is for me the best white pen I have tried. It covers black perfectly – which means it covers all colors and it is amazing with most surfaces – unless it is the super scratchy one. Gets ruined very quick if you use it on “fat” surfaces or not “dry” surfaces. I used to be able to find refills at my local office supply store which was actually making this a bargain and made me happy for eco-friendly reasons. I need to check out where I can find them now.

This is a soft water soluble graphite stick and I love this for sketching or mostlymaking marks into painted dried and wet surfaces. Well- if the surface is wet you make texture and need to clean the tip of the stick right away with a dry towel. It is paper wrapped and you can take the wrapper off as you use it.

These are my secret weapons…LOL. You could say…the Dumbledores under the Markers ![]() . The Posca water based paint marker has in the size of 0.9-1.3 mm abullet shape tip and I tend to love this as I find myself writing easily with this. I love how the paint comes flowing out and I can use it – as well as the Molotow marker on tricky surfaces…well set aside super waxy or oily surfaces of course. On acrylic paint it looks shiny – I love it! I am not a fan though of the white Posca Marker – it doesn’t cover the way I would like it.
. The Posca water based paint marker has in the size of 0.9-1.3 mm abullet shape tip and I tend to love this as I find myself writing easily with this. I love how the paint comes flowing out and I can use it – as well as the Molotow marker on tricky surfaces…well set aside super waxy or oily surfaces of course. On acrylic paint it looks shiny – I love it! I am not a fan though of the white Posca Marker – it doesn’t cover the way I would like it.
The Molotow Marker is a bit pricier, but it can be also refilled and I would say it can be used on even trickier surfaces than the Posca Marker…you can write on the most uneven stoney surfaces with it, without ruining the tip right away and you can use it for outdoor projects too. Ahem..if you think of Molotow Graffiti Spray Paints you might get why this marker is so good with struggling surfaces ![]() . The white Molotow Marker is better than the white Posca Marker.
. The white Molotow Marker is better than the white Posca Marker.
Both markers are awesome as you can use them also on fabric and wood and they do not bleed. The colors are intense and highly pigmented, they don’t fade too quick….I love love love them. I have markers of both companies for YEARS and they are still good to go and not dried out. If you ever want to make me happy with a present… DEAR FAMILY ….just give me a package of one of those ![]()

This marker is fun- I don’t have it that long but it makes me smile and I love to use it on large-scale projects to write my own title or for bigger marks. It has this very wide angled tip which makes it easy to use it for calligraphy like writing in a graffiti style ![]() And hey…who can resist a marker that says: “waterproof on almost every material. recap after use and be on the run!” and is manufactured by a company called ON THE RUN.
And hey…who can resist a marker that says: “waterproof on almost every material. recap after use and be on the run!” and is manufactured by a company called ON THE RUN.
 |
 |
 |
 |
 |
 |
 |
————————————————————————————————————————————————————————-
4. Stamps
There is rarely a Mixed Media Project where I do not include stamping. By no means I am a stamping expert…but let me tell you about what I do and what I know and how I use them.
If you missed the other posts in this series – you can catch up here

Stamping on Mixed Media Project is just one of my favorite techniques:
What I love about Stamps is:
- I love that there is different sorts of stamps out there
- they can be used with many different mediums: ink pads, acrylic inks, acrylic paints, resist mediums, gesso, tar gel, spray paints, pan pastels, water soluable wax bars and so much more.
- they can be used for adding images or just adding visual imperfect interest
- they can be used to lighten or darken a background
- they can be used to add texture
- they can be used to connect design elements
- they can be used to unify a look
- some of them can be used FOREVER…my wooden letter stamp set in the picture was the first stamp set I bought in 2003. I used it still A LOT! Worth every single cent!
Here are some examples:
using a bottle bottom for stamping

unifying the background

using a hand carved stamp to lighten background and adding visual interest

stamping with and into beeswax

adding visual texture with stamps

using foam stamps with spray paints and Derwent Artbars

using different stamps for layering in an artjournal

using stamps to create resist effects

using rubber text stamp to create overlay

My favorite Stamps:
As always in this series- the answer to this question is based on my preferences, my style and my experiences
- one preference for me are rubber stamps that have writing – I love to include letters and text to my background. I have so many different ones from Stamper’s Anonymous, Darkroom Door etc. to name just a few companies that do awesome Text Stamps in my opinion.
- I love foam stamps– they are cheap and versatile and you can do an awful lot with them. That is why I offer an Online Class called Über*Media Foam Stamplifier – I find it simply amazing how many different ways you can use a Foam stamp My favorite foam stamps are made by Prima, but you can also make your own foam stamps.
- constantly using bubble wrap, lids, corrugated cardboard and toilet paper tubes for stamping. Can’t get any cheaper and more handy. If you travel you will always find ways to stamp if you look for stuff like this instead of hauling lot’s of stamps with you for some traveling art.
- letter stamps – my to go for titles and often a great way to add journaling on difficult surfaces.
- hand carved stamps…getting there more and more. If you are interested in those, I highly highly recommend my friend’s Julie Fei-Fan Balzers Online Class on Stamp Carving. She rocks the house and is an amazing teacher!
 |
 |
 |
 |
 |
———————————————————–
5. Stencils & Masks

Stencils and Masks are a constant companion of mine while creating. If you would see the stack of stencils I own you would think I am a hoarder (well I am in some perspective ![]() )- but to my excuse I have to say- I might own like 15 times the same stencil because I use them in my workshops a lot. Because they are AWESOME to use in all kinds of projects!
)- but to my excuse I have to say- I might own like 15 times the same stencil because I use them in my workshops a lot. Because they are AWESOME to use in all kinds of projects!
What I love about Stencils & Masks:
- You can add with many different paint media wonderful images to a project
- You can use them to create dimension and layers
- They can be an awesome tool to add texture
- They can be wonderful stamps
- You can use them for Embossing
- They can be easily created by yourself
- If made out of the right material they can be used FOREVER
- They can ground a background
- You can also use them for tracing patterns
Here are some examples:
Using Stencils to trace the stars and make dimensional embellishments and with paint medium

Creating Texture with Black Gesso and Stencil

Stencils with Graffiti Spray Paints layered for a plant pot

with mostly self made stencils

Texture with mixed acrylic paint and artist spackle

Stencil used in a Die Cut Machine with Canvas Fabric to dry emboss

Masks used with ink pads for a background

Masks used with heavy bodied Acrylic paints

with water based spray paints

with a marker

Cut out stencil image

And there is so much more!
Which Stencils & Masks I love to use:
As always in this series- the answer to this question is based on my preferences, my style and my experiences
- Since I do love to create texture with my stencils and masks I am always on the hunt for thicker material
- I do love to use plastic or similar material ones because I want to use them FOREVER and with wet paint media too
- Of course since I create my own designs for Stencil Girl Products – I love my own designs for them 🙂 (It would be weird if not 😉 ) and I love their designs by the other artists too! Very cool stencils.
- The other brands I use that in my eyes have the most awesome designs and are of thicker design and the material I like (and I might miss some of course – I can only list the ones I own and tried!) are by: The Crafter’s Workshop (I think I probably have almost all of them – mostly Julie Fei Fan Balzer Designs and Ronda Palazzari but also some of Dyan’s – still missing on Dina Wakley’s – this has to change!), Tattered Angels (they do not make them anymore at the moment so I hold on to my old ones), and Pink Paislee (only had a few desings- but I do love them!)
- I do love some of the thinner masks too – I try to use those more with spray paints or dry paint media, so that I do not ruin them. The thinner the material the more you can expect detailed images and intriguing images. So it is a bit: one or the other. As designs for thick ones I love a lot of the Prima Marketing Masks that are out there – but again they are very thin and must be treated carefully in order to not rip them.
- self-made stencils – I love to use thick plastic sheets or cardboard for this. Crafter’s Workshop Templates is now actually now also offering sheets to make your own stencils.
- House hold item stencils- there is a lot of things that you can use as stencils that you probably have: lace, punchinella, screen mash, nets that hold your potatoes or onions, plastic place mats that have a cut out pattern, die cuts…just look at your supplies and think how it could look like if you would use spray paint or other paint media over it.
- Letter Stencils from the Hardware or Art Supply store because I love to add titles with stenciled letters
 |
 |
|
 |
 |
 |
 |
 |
 |
 |
 |
 |
next Mixed Media Essentials is coming soon 🙂


Beautiful art and very useful info!
I love your work. It’s really different and beautiful. I find lot’s of inspiration in your work.
Great read with lots of good info! Thank you for sharing.
TY so much for this series. Great tips & tricks on how to use your faves.
I LOVE your discussions on tools of all sorts. BTW, I should have said that I just love ALL the discussions so far, including the tape technique w/embossing.
BIG Hugs,
Your work is inspirational!
I really enjoyed these entries. I often wonder how different effects are achieved. I have better idea and wil try acrylic paints. I love your work, it’s inspiring and evokes all kinds of emotions. Thank you!